Tuesday 25 December 2012


Sunday 2 December 2012
ORA-27476: "MAXIMO.MAXIMOTSSYNC" does not exist when Upgrading Maximo 7.1.1.10 to Maximo 7.5.0
ORA-27476: "MAXIMO.MAXIMOTSSYNC" does not exist
This problem Mainly i faced during Upgrading Maximo 7.1.1.10 to Maximo 7.5.0.
Step 1 : Change to use DBMS_SCHEDULER
CREATE OR REPLACE PROCEDURE maximo_ts_job_call AS
BEGIN
dbms_scheduler.create_job(
job_name => 'MAXIMOTSSYNC',
job_type => 'STORED_PROCEDURE',
job_action => 'maximo_ts_job',
start_date => SYSDATE,
repeat_interval => 'SYSDATE + 5/1440',
enabled => TRUE);
END;
/
exec maximo_ts_job_call();
select job, substr(what,1,80) from user_jobs;
Re-run Integrity checker
Tuesday 27 November 2012
Importing Job Plan and Tasks in Maximo
How can I import a jobplan, and have predecessor tasks appear?
Create a jobplan object structure.
Add JPTASKRELATION to the object structure, as a child of JOBPLAN.
Restrict JPTASKRELATIONID and JOBPLANID.
Wednesday 14 November 2012
Rules for Job Plan Field is Not Editable / Why Job Plan Field is Not Editable Even In WAPPR status?
There are rules
for setting JPNUM to be editable or not. The job plan is read only and not
editable when:
1. If any work
plan components exist (task work orders)
2. If there are any planned( labor, material, tool)
3. Parent or Task work orders have gone through approval status in the past
NOTE: The users must decide whether they want to either manually enter work plan or use job plan as a template for copying tasks to work orders.
To correct the problem via the front end, make a duplicate of the work order and then enter a job plan on the duplicate. Then start using the duplicate work order with job plan attached.
Thursday 1 November 2012
Difference between Rotating assets and non-rotating assets
Difference between Rotating assets and non-rotating assets
Assets can be either rotating or non-rotating.
| Rotating Asset | Non- Rotating Asset |
| 1. Rotating assets are assets that are interchangeable, such as motors, pumps, fire extinguishers, or PC monitors. | 1. Non- Rotating Asset are asset that are not interchangable such as Land, Buildings, |
| 2. Rotating assets have both a unique asset number and an inventory item number. | 2. Non- Rotating assets have only unique asset number. |
| 3. You can use the item number to track assets as a group as assets are moved in and out of inventory and other types of locations. | 3. A non-rotating asset has a unique asset
number, but does not have an item number because it is not tracked in
inventory. |
| 4. The asset number is useful for tracking instances of assets
as they are moved from one location to another and from one site to another.
|
4. Non-rotating assets do not move in and out of storerooms. |
| 5. Before you can create a record for a rotating asset in the Assets application, the rotating item record must first be created in the Item Master application. | |
| Example of a rotating asset A company might have four identical (same make, same model) centrifugal pumps, so all four pumps would have the same item number. To track the use, the repairs, and the locations of each individual pump, each pump has its own, unique asset number. |
|
Sunday 21 October 2012
How to Hide Attributes And Sections In Maximo .
1. Click on Go To --> System Configuration --> Platform Configuration /
Application Designer.
2. Select the application you want to hide fields i.e.
3. Next, once you open the application in application designer, Go to Select Action and select Add/Modify Signature Options.
4. At the bottom of the pop-up box click New Row.
5. In the option box, type a name like "ShowNever".
6. Uncheck the visible checkbox and then click OK.
7. Now, click on the section/field you want to hide.
8. Go to the properties of that field, go to the signature option and type the name of the option you just created in step 5.
9. Save the form and your field/section is now hidden.
10. Also, if you wish to show the field/section hide in above steps for some users then just go to the security groups and give grant access, for the corresponding application.
Wednesday 17 October 2012
What are Reservation Type in Maximo?
In Maximo 7.5, planned material line on a work order allows the users to
specify various inventory item reservations types: AUTOMATIC, HARD, SOFT
HARD Reservation is a time sensitive
reservation. Hard reservation is based on a first in, first assigned basis. If
a hard reservation comes in, the inventory then modified accordingly.A soft reservation only ensures that items or tools are being reserved for the work order and this reservation type is not time sensitive.
Automatic processing type considers the required date specified on the work order
Below is a screen shot to show AUTOMATIC reservation type.
Note: Required Date has an asterisk which indicates a required field.

Back
order is only done through automatic reservation type and where negative
availability is not allowed. InvReservationResTypeUpdateCronTask Cron Task will
try to update the the restype field on Inventory reservations from APSOFT to
APHARD.
Thursday 11 October 2012
What is use of Update Database Option in Chart of Accounts?
In the Chart Of Accounts under the Select Action menu there is an Update
Database option. This option is meant to be used after a modification has been
made to a default GL Account or resource code.
As an example say the Control
Account of a storeroom was changed since this GL defaults into place as the
credit or debit account one would have to use the Update Database options to
push the changes through so the new GL can be used.
Here is an explanation of how the above 3 options work:
Overwrite
Blank Accounts only?
Suppose you created an account code for the GL Account field of an existing item type. The GL Account field of the item is overwritten only where it is blank, but not where a GL account was entered.
Overwrite Accounts With Old Defaults?
Overwrites blank fields and GL account fields that have the previous GL account. Suppose an item type had a GL account code associated with it in Chart of Accounts. This code was inserted on item records that used the item type. On some records, the account code was changed.
Overwrite All Accounts:
Overwrites all relevant GL Account fields in Maximo records. Suppose an item type has a GL account code associated with it in Chart of Accounts. All blank GL Account fields for that item type and all existing GL Account fields for items of that type, including ones that were subsequently changed, are overwritten.
How to configure to display name in a PERSONID, USERID or LABORID field?
Example to have the Affected Person and Reported By fields displaying
the PERSONID full name in the Create Service Request (CREATESR) application.
To have this configuration working, the administrator has to take the following steps:
Step1:
Log into Maximo as MAXADMIN
Go to - System Configuration - Platform Configuration - Database Configuration
Bring up the TICKET object
In the Relationship tab click New Row and add the following relationship:
Relationship à REPORTEDBY
Where Clause à personid=:reportedby
Child Object à PERSON
Click New Row again and add the following relationship:
Relationship à AFFECTEDPERSON
Where Clause à personid=:affectedperson
Child Object à PERSON
Save it.
Step2:
Go to - System Configuration - Platform Configuration - Application Designer
Access the CREATESR application
2. 1 Click on the icon to add a textbox - drag and drop a textbox to the screen just below the Reported By field.
Highlight the newly added field;
Click on control properties - add the following:
Attribute -> REPORTEDBY.DISPLAYNAME
2.2 Click on the icon to add a textbox - drag and drop a textbox to the screen just below the Affected User field.
Highlight the newly added field
Click on control properties - add the following:
Attribute -> AFFECTEDPERSON.DISPLAYNAME
Save - sign out of Maximo - close browser - sign back into Maximo;
Open the Create Service Request app - Ensure that the changes display correctly.
Attribute -> AFFECTEDPERSON.DISPLAYNAME
Save - sign out of Maximo - close browser - sign back into Maximo;
Open the Create Service Request app - Ensure that the changes display correctly.
Friday 5 October 2012
How to Create Consignment Inventory
Before we move to how to create consignment inventory in maximo, one should Know
What is consignment Inventor
Consignment Inventory is inventory that is in the possession of the customer, but is still owned by
the supplier.
In other words, the supplier places some of his inventory in his customer’s possession (in their
store or warehouse) and allows them to sell or consume directly from his stock. The customer
purchases the inventory only after he has resold or consumed it.
* Consignment Inventory can be created for those items only which is marked as consignment items
in Inventory application
1. Navigate to Path goto
Inventory Inventory
2. Select the item for which you want to create “Consignment Inventory”. Example
3. Click on Select
Action Menu and locate “View/Edit Consignment Details”.

Click on it

You will notice all
filed are read-only accept Consignment, check the Consignment?

Fill the Consignment
Vendor and other details

Please note
that the item must not be referenced on a PO / PR and have a reconciled current
balance of zero in order to make this change.
Work order statuses
Work order statuses
The status of a work order indicates its position in the processing
cycle. The status determines which actions can be performed on the work order.
For example, if the work order is approved (APPR), then the tasks can start.
WAPPR
The work order is
waiting for approval. WAPPR is the default status for records created in the
Work Order Tracking, Changes, Releases, and Activities applications.
APPR
The work order is
approved and the work can begin.
WSCH
The work order is
waiting to be scheduled. WSCH is the default status for records created in the
Preventive Maintenance application.
WMATL
Materials must arrive
before the work can be performed.
WPCOND
The work can be
performed only when the condition of the plant is suitable. For example,
certain work might require the shutdown of the plant.
INPRG
The work is in
progress. INPRG is the default status for work orders created in the Quick
Reporting application.
COMP
The physical work is
completed.
CLOSE
The work order is
closed. Inventory reservations for items not used in the work order are removed
and the work order is made into a history record.
CAN
The work is canceled.
You cannot cancel a work order if the work has already been initiated or if
actuals have already been reported.
Effects of changing work order statuses
Work orders can be controlled by a
workflow or other process, which can lead to automatic status changes.
Child work orders can inherit status
changes from their parent. Inheritance of status changes is controlled by the Inherit
Status Changes check box.
The following table shows the effects
of changing the status of a work order.
|
Status
|
Effects
|
|
APPR
|
|
|
CAN
|
· Work orders that
have not been initiated are canceled.
|
|
CLOSE
|
|
|
COMP
|
|
|
INPRG
|
|
Saturday 28 July 2012
BMXAA3878E - Password is required
Steps To solve this issue:
1.
Click Go to -->System Configuration --> Migration --> Object Structures to open the Object Structures application.
2.
In the Object Structure field, type MXPERUSER
and press Enter. Click MXPERUSER to open the MXPERUSER object.
3.
Select the Inbound Setting Restrictions action.
4.
Highlight MAXUSER.
5.
Locate the PASSWORDCHECK and PASSWORDINPUT
attributes in the list. For each attribute, check the box in the Override
column, then clear the box in the Restricted column.
6.
Click OK.
Results
After you have cleared
the PASSWORDCHECK and PASSWORDINPUT attributes and clicked OK, you can import
the user data.
Note:
After you have finished loading user data, return
these attributes to their prior settings. If you leave them unchecked, you
cannot use Migration Manager to move user data from one environment to another.
Wednesday 11 July 2012
Migration scenario: Migration of business process workflow data
For the migration scenario, you will use a simple Service Request (SR)
workflow process that automatically sets the internal priority of a new SR and
places it in the inbox of a service desk manager. The manager reviews the SR
and places it into the queue of a service desk agent. The agent receives an
automatic email notification with directions to take action based on the queued
SR.
Creating the workflow process and related configuration data
Step 1:- Login to the
Maximo as an administrative user.
Step 2:- Access the Roles
application by navigating to System Configuration àPlatform Configuration à Roles.
Step 3:- Click the New
Role button to create a new role.
Step 4:- In the Role tab,
specify the role name as ‘SDAGNT’, Type as ‘A set of data related to
the record’, Object as ‘SR’ and Value as ‘:owner’ (you can
use the lookup available for the Value field to select the OWNER
attribute of SR). Accept other defaulted values. Save the record.

Step 5:- Access the Actions application by navigating to System ConfigurationàPlatform ConfigurationàActions.
Step 6:- Click the New Action button to create a new action.
Step 7:- In the Action tab, specify the action name as ‘MMACT’, Object
as ‘SR’, Type as ‘Set Value’, Value as ‘1’ and
Parameter/Attribute as ‘internalpriority’ (you can use the lookup
available for the Parameter/Attribute field to select the INTERNALPRIORITY
attribute of SR). Accept other defaulted values. Save the record.

Step 8:- Access the Communication Templates application by navigating to
System ConfigurationàPlatform
ConfigurationàCommunication
Templates.
Step 9:- Click the New Communication Template button to create a new
communication template.
Step 10:- In the Communication Template tab, specify the Template as ‘MMNOTIF’,
Applies To as ‘SR’, Send From as an email address, Subject as ‘Service
Request
:ticketid has been prioritized’, Message as ‘Service
Request :ticketid has been set to internal priority :internalpriority – please
take action.’ Save the record.

Step 11:- Now click on the Recipients tab of the Communication Templates
application for the same template. Open the Roles section in the Recipients tab
by clicking the Show Roles icon. Click Select Roles button. In the Select Roles
lookup, search for and locate the ‘SDAGNT’ role. Check the box to the
left of the role record and click OK to carry the value to the Recipients tab.
Select the To check box for the role record brought back to the Recipients tab.

Step 12:- Click the Change Status button on the application tool bar. In the
Change Status dialog that appears, change the status to ACTIVE.
Step 13:- Access the Workflow Designer application by navigating to System
ConfigurationàPlatform
ConfigurationàWorkflow
Designer
Step 14:- Click the New Process button to create a new workflow process
definition.
Step 15:- In the Canvas tab, specify Process as ‘MMWF’, Object as ‘SR’.
Step 16:- Click the canvas applet to activate it. The canvas already displays
Start and Stop nodes.
Step 17:-Using the canvas, drag and drop a condition node. Right click the node
to bring up its properties. In the Condition Node Properties dialog, specify
Title as ‘ISNEW’,
Description as ‘Is New Service Request?’, Expression as ‘:status=’NEW’’.
Click OK to save the changes.
Step 18:- Drag and drop another condition node. Right click the node to bring
up its properties. In the Condition Node properties dialog, specify Title as ‘ISHIPRT’,
Description as ‘Is High Priority Service Request?’ Expression as ‘:reportedpriority
< 3’. Click OK to save the changes.
Step 19: Drag and drop a Task node. Right click the node to bring up its properties.
In the Task Node properties dialog, specify Title as ‘QUESR’,
Description as ‘Queue the Service Request’ and Application as ‘SR’.
Click New Row in the Assignments section and specify Role ID as ‘SDMGR’
and application as ‘SR’. Accept all other defaulted values. Click OK to
save the changes.
Step 20: Drag and drop positive connect lines (blue lines) between all the
nodes on the canvas. Also drag and drop negative connect lines (red dashed
lines) between the ISNEW, ISHIPRT condition nodes and the STOP
node.
Step 21: Right click the positive connect line between the QUESR task node and
STOP node. In the Action properties dialog that appears, specify Action as ‘MMACT’.
Click
New Row in the Notifications section and specify the Communication
Template as ‘MMNOTIF’. Accept all other defaulted values. Click OK to
save the changes.
Step 22: Click save Process.
Migrating the workflow process and related data
The migration tasks to be performed are:
1. Organize the content that will encompass just the types of records
listed above (workflow process, communication template, action, and role)
2. Define a migration package that will include just the records
containing this newly organized content, and create, distribute and deploy a
physical package based on this package definition.
Step 1A: Login as an administrative user.
Step 1b: Access the Object Structures application by navigating to System
ConfigurationàMigrationàObject Structures.
Step 1c. Once the Object Structures application is displayed, type ‘DMWF%’
in the
Object Structure column of the List tab and press Enter.
Step 1d. A single result shows up, DMWFPROCESS. This object structure organizes
the content of the workflow process definition. Select this entry. The Object
Structure tab opens to show you the details of the DMWFPROCESS object
structure. You will notice there are 17 BOs that comprise the workflow process
definition. You need not change anything here. Review the BOs and the
relationships among them.

Step 1e: There is some related data to
migrate as well, including the roles, notifications (communication templates),
and actions. Return to the List tab of the Object Structures application. This
time, enter ‘DMROLE’ in the Object Structure column. Select this entry.
The Object Structure tab opens to show you the details of the DMROLE. This
object structure consists primarily of MAXROLE BO.

Step 1f: From the List tab of the Object Structures application, enter ‘DMCOMMTEMPLATE’.
A single result shows up. Select this entry. The Object Structure tab opens to
show you the details of the DMCOMMTEMPLATE object structure. Make a note of the
BOs in this object structure which are primarily COMMTEMPLATE, COMMTMPLTSENDTO,
and COMMTEMPLATEDOCS.

Step 1g. Finally, from the List tab of the Object Structures application, enter
‘DMACTION’ Select the DMACTION entry. The Object Structure tab opens to
show you the details of DMACTION.

Step 2a: If you have
logged out, login as an administrative user.
Step 2b: Access the
Migration Groups application by navigating to System
Configuration à Migration à Migration
Groups.
Step 2c: Once the
Migration Groups application opens, hit Enter in the List tab. All the
available migration groups are displayed. From this list, select the BPM
(Business Process Management) entry. The Migration Group tab opens to show you
the contents of the BPM group as shown below:

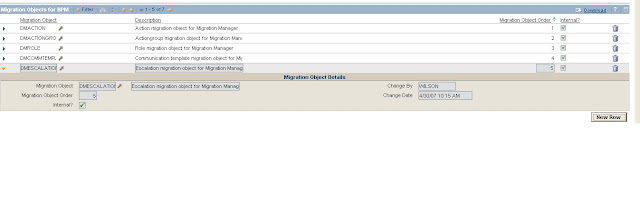
Step 2d: There are two sections: Migration Objects and Dependency. The first
section,
Migration Objects for BPM, lists the migration objects (object
structures) that are part of the BPM group. These objects include: DMACTION, DMACTIONGROUP, DMROLE,
DMCOMMTEMPLATE, DMESCALATION, DMWFPROCESS and DMINBOUNDCOMM, in that order.
From this list, it is obvious that the object structures of interest are already
members of the BPM group. In the current scenario, you have not built any
escalation (DMESCALATION) nor do you need to migrate any Email Listener
configurations (DMINBOUNDCOMM).
Step 2e: The second
section, ‘Dependency’ lists other groups on which the BPM migration group is
dependent. Dependencies can apply if you have put together a new custom
application including new BOs, domains, tabs, and dialogs, and so on. This is
not the case for the scenario. All you have to migrate is a single workflow process
and its constituent data.

Step 2f: Since no
dependencies are required, you should discard all the entries in the Dependency
section. You cannot change the migration groups shipped with the product
(notice they are marked ‘Internal’ in the List tab). So you will duplicate the
BPM group to create MYBPM group. User-created groups can be managed as desired.
In the
MYBPM group, you
will discard all dependencies.
Step 2g. With the BPM
group selected, drop down the Select Action menu and select
Duplicate
Migration Group to duplicate the BPM group. Specify the name of the new group
as ‘MYBPM’, add a description (for example, “Workflow only”).
Accept the default order of 12 assigned to this new group as shown
below:

Step 2h. You can now
remove the existing dependencies that were copied over from BPM. Delete each
dependency using the Mark Row for Delete icon to the right in the Dependency
section. This is what you should see:

Step 2i: You are now
left with just the object structures that are members of the MYBPM group. You
only need the DMACTION, DMROLE, DMCOMMTEMPLATE, and
DMWFPROCESS
object structures. You do not need the DMACTIONGROUP, DMESCALATION, or
DMINBOUNDCOMMCFG object structures because you have no changes in these areas.
Delete DMACTIONGROUP, DMESCALATION, and DMINBOUNDCOMMCFG from the Migration
Objects table window. Save the MYBPM group. This is what you should see:


You have now
created a migration group that can be used to migrate only workflow definitions
and related data without other data such as Data Dictionary or Application.
This will better
fit the need to carry the MMWF workflow process definition.
Step 3a: If you have
logged out, login as an administrative user.
Step 3b: Access the
Migration Manager application by navigating to System ConfigurationàMigrationàMigration Manager.
Step 3: Once the
Migration Manager Application opens, click the New Package Definition button in
the application tool bar. This causes the Package Definition tab to activate
and present a new definition you can work with.
Step 3d: In the Package
Definition Name field, enter a value that represents the package you want to
manage. For example ‘mmwf’, Notice that the Source field has been
automatically populated. Accept the default value of SNAPSHOT for the
Type field.
Also accept the
default value of 100 for the Batch Size field.
Step 3e: In this step,
you will include the newly created MYBPM group in this package definition. By
doing this you are declaring the content of the package to contain workflow definitions
and related data. Click New Row in the Migration Groups section. In the new row
that opens up, click the Detail Menu and then click Select Value. From the
Select Value dialog that shows, select “MYBPM”. Once the value is
returned to the Migration Groups section, click Save in the application toolbar
to save this definition. This is what you should see (the Source value depends
on your environment):

Step 3f: The status of
the package definition is WAPPR (waiting for approval). As long as the status
is pending approval, you can modify the contents of the package definition. For
this particular package, leave the status at WAPPR.
Decision Point: The contents
of a package definition can be modified as long as the definition status is
waiting for approval.
Step 3g. Earlier, you
created a single workflow process definition and some related data. The
scenario calls for the migration of this one workflow process and its related
data. With the current package definition, all workflow processes, all roles,
all actions, and all active communication templates in the source environment
will be brought into the physical package during package creation. This is not
the migration requirement. You need to filter the package contents to just the
specific ‘MMWF’ workflow. You can set up such a filter as part of the
definition.
Step 3h. Click the Set
Where Clause icon to the right of the MYBPM entry in the Migration Groups
section. The Set Where Clause dialog opens up. This dialog now lists the
migration objects included in the MYBPM group. The objects are listed in the
order in which they have been included in the MYBPM group. This is what you
should see:

Step 3j: In this step,
you will attach an SQL where condition to each migration object so that the
physical package, once created, will only contain the MMWF workflow process and
related records. Select the DMACTION migration object. Click the SQL Expression
Builder icon to the right of this row. In the new dialog that shows up, select
the ‘ACTION’ attribute. Type in the following after the attribute in the
Expression field: ‘=’MMACT’’. This is what you should see:

By adding this
where condition, you have filtered action records to just MMACT action
which is being used by workflow MMWF. Click OK to carry this where
condition back into the Set Where Clause dialog for DMACTION.

Step 3l. In the Set
Where Clause dialog, select the DMCOMMTEMPLATE migration object. Click the SQL
Expression Builder icon to the right of this row. In the expression builder
dialog, select the TEMPLATEID attribute from the attribute list. Type in
the following after the attribute in the Expression field: ‘=‘MMNOTIF’’.
By adding this where condition, you have filtered communication template
records to just the single template which is being used by workflow MMWF.
Click OK to carry this where condition back into the Set Where Clause dialog
for DMCOMMTEMPLATE.

Step 3m. In the Set
Where Clause dialog, select the DMWFPROCESS migration object.
Click the SQL
Expression Builder icon to the right of this row. In the expression builder
dialog, select the PROCESSNAME attribute from the attribute list. Type
in the following after the attribute in the Expression field: ‘=’MMWF’’.
MMWF process is the only workflow process that will be included in the physical
package. Click OK to carry this where condition back into the Set Where Clause
dialog for DMWFPROCESS. With steps 3h through 3m, you have set up
a number of filters such that only the MMWF workflow process and related
artifacts are included in a physical package. Here is what you should see in
the Set Where Clause dialog:


Click OK. You
are now ready to approve the package.
Step 5: Before you can
proceed with any other package-related operations, you must activate the
package. Package activation prepares it for the rest of the package life-cycle.
In the Migration
Manager application, use the Select Action menu and drop down the list and
select Activate/Deactivate Package Definition. You will notice that the Active?
Check box to the right of the Package Definition tab header area is now
checked. You have now completed the tasks required to prepare for a physical
package.

Step 6: You can now visually
verify the contents of the package definition using the Package Definition
Structure tab. In the Migration Manager application, activate the Package
Definition Structure tab. This brings up a hierarchical view of your package
definition. To verify the contents, you can drill down into the Migration
Groups node of the hierarchy. You will see MYBPM is immediately under Migration
Groups. You can now expand MYBPM and verify the individual migration objects
within the group. You can also open each migration object and verify each BO
within the object. This visual verification step helps you determine the total
contents of any physical package based on this definition.
The file system
should be accessible to the application server where the product is executing.
Later, you will download this package to your client machine.
In the Migration Manager Application tool bar,
click the Manage Targets icon. This brings up a dialog. Click New Row in the
dialog. This creates a new row in the Targets section and opens a Target
Details section below it. Enter a target name – this can be any name but must
be meaningful in that it represents a target; for example, ‘3lg9r91’. Enter or
select Type to be FILE since you would like to distribute the physical
package in the form of a file. In the Database URL or File Path field enter ‘c:
\temp’ (or other appropriate folder if you have you own local build). This
is the folder into which the physical package file will be copied upon
distribution. This is a folder accessible to the application server. You should
see something similar to this:

Step 7b: Click OK to
save this new target and dismiss the Manage Targets dialog.
Step 7c: In this step
you will link your approved package definition to the newly defined target. A
distribution is what links a package to a particular target. In the Migration
Manager application activate the Distribution tab. Click New Row in the
Distributions section. From the new row that is created use the look up on the
Target Name field or type in the target you defined in step 7a. Click
Save in the application tool bar to save this distribution record. You should
see something similar to this:

Step 8 You are now
ready to create the package. In the Migration Manager application activate the
Package tab. The Package tab displays an empty Packages section having a
Create button.
Click the Create button. This begins the package creation. Package creation may
take several minutes depending upon the volume of data to be collected.
Data collection
(or export) is based entirely upon the package definition.
Step 8a: When you click
the Create button, the Upload Compiled Sources dialog is displayed.


This dialog serves
two purposes: 1. to collect compiled sources that should be part of the package
– these files can be uploaded using this dialog. 2. To enter read me
information regarding the particular physical package that can be reviewed in a
target environment prior to deployment. You did not specify any compiled
sources for your package, so you can ignore the Compiled Sources section. In
the Read Me Information field, enter text that describes the content of the
package. For example, enter “workflow artifacts for MMWF workflow
targeting Service Requests”. Click
Continue to continue the package creation.
No more user
activity or intervention is required until the package is fully created. During
package creation, the progress dialog is visible and shows messages as creation
tasks progress. At the end of package creation, you should see something
similar to this:

Once package
creation is complete, the progress dialog shows a ‘Done’ or ‘Processing
Complete’ message at the top of the dialog and enables the OK button. Click the
OK button to dismiss the dialog.
Once created,
the Package tab refreshes to show the new package record. The Manifest sub-tab
below the Packages section shows the manifest for the package. Review the
manifest and look at the listing of various migration objects that now contain
actual data for the MMWF workflow process.

Step
9: You will distribute the newly generated
package to the target you associated with the package definition. In the
Migration Manager application, in the Packages section of the Package tab,
select the package you created in step 8. Click the Distribute button to
the right of the Create button.

Step 9a: The Distribute
Package dialog appears. This dialog lists all of the targets that have been
associated with the particular package definition. In the scenario, there is
only one target. Select this target by checking the box to the left of the
Distribution row and click the OK button. This initiates the distribution. The
progress dialog appears and messages are posted to the dialog as distribution
progresses. Once complete, the dialog displays a ‘Done’ or ‘Processing
Complete’ message and you click the OK button to dismiss the dialog.

NOTE:
Distribution may take several seconds or minutes depending upon how much data
are to be written into the file.
You have now
distributed the contents of the physical package to a file that currently
resides on the application server’s file system. You can, if necessary,
download this file to the client machine where you are working from.

Clicking the
icon will bring up the File Download dialog box with Open, Save and
Cancel buttons.
This is a standard Windows® download dialog. You should see something similar
to this:

Click Save. A
Save As dialog opens allowing you to choose a folder on the client machine
where the file should be saved. After navigating to a folder, click Save to
save the file to the particular folder on the client machine.
NOTE: You can
download a package file only after you have distributed it. No file exists at
the time package creation is complete.
With this step
you have completed all of the migration activities necessary in the source
environment. You started with the identification of changes to be migrated; you
determined the need to organize content, and then defined a package that would
serve as a template for physical packages. You approved and activated the
definition. After associating a target with the definition, you created and
distributed the package to the chosen target.
Scenario preparation in the target environment
The MMWF
workflow and related records that you packaged up in source should be brought
over to the target environment for testing. In this scenario, these are all new
artifacts that do not exist in the test environment.
The key tasks of
migration (definition, creation, distribution) have been already performed in
the source environment. Just one task remains: deployment. The package that was
distributed in Step 9a in the previous section of this document will now
be brought into the target environment and deployed using the Migration Manager
application. Step 1 In this step you will upload the package file into
the target environment.
Currently, you
have a copy of the file on your client machine.
Step 1a: Login to the
target environment as an administrative user.
Step 1b: Navigate to
the Migration Manager application using System Configurationà Migrationà Migration Manager.
Step 1c. When the
Migration Manager application is displayed, the List tab of the application is
active. From the Select Action menu, select the Upload Package action.
This will bring up the Upload Package dialog box
as shown below:

Step 1d. The Upload
Package dialog box presents a Browse button. Use this button to browse your
client machine and locate the package file that you had downloaded from source
environment. Select the package file, click Open to bring back the folder and
file information into the Upload Package dialog box. Click OK in this dialog to
physically upload the package file into the test environment. The file has been
placed in a sub-folder on the application server machine. The Migration Manager
becomes aware that a new package is available for deployment.

Click this icon
and verify the contents of the package. The View Manifest dialog is shown
below:

Dismiss the View
Manifest dialog.
Step 3: In order to
begin deployment from the Deploy Package dialog, you must first confirm that
you have a database backup in place. Remember the Migration Manager has no
package rollback functionality. If there is a failure in deployment, your only
option to recover may be to restore your database from a backup. Check the Do
you have a current database backup? Check box. Then click the Deploy button.
Step 4: Upon clicking
the Deploy button, the Electronic Signature authentication dialog shows up.
Enter the password for the currently logged in user and a memo into the Reason
for Change field. Click OK, to proceed with deployment.
At this point a
progress dialog appears and is populated with progress messages as deployment
proceeds. You can watch these messages to gain a better understanding of the
deployment tasks the Migration Manager performs.
Once the
deployment completes, the progress dialog posts a ‘Done’ or ‘Processing
Complete’
message to the top of the dialog. The OK button is also enabled allowing you to
close the dialog. The Migration Manager application is refreshed to show you
the Package tab. When you review the contents of the Package tab, you will see
that there is a row in the Packages tab for the package that you just deployed.
It shows a status of DEPLOYED.
For this
package, the deployment does not require you to log out or re-start the application
server to see the changes take effect. So you can access the Workflow
Designer application
and bring up the ‘MMWF’ workflow process. You will see that the workflow is
laid out exactly as in the source environment. It is disabled and inactive.
Now you can
validate this process, enable it, and activate it.
Subscribe to:
Posts (Atom)